W7 Bandsintown API artist tracker visualization

For this API assignment, I wanted to create some sort of artist follower visualization. So I looked up API documentations for SoundCloud, Spotify, Songkick, and Bandsintown. I requested my API keys and only Bandsintown got back to me. I was able to get different artist information and artist event in json on their public API. However, as i tried to access the same json URL(var url = 'https://rest.bandsintown.com/artists/stimming?app_id=09f313e072cd1b192f200fb70df19ea5') I opened it on the browser on P5 editor, it was always giving me Script error. (: line 0). I changed my editor and same problem still persisted. I couldn't figure out what was the issue, so I decided to manually importing a selection of artists json files to my editor. My original goal was to have user input artist names, the input would locate artists' tracker counts in Bandsintown database, and then have the tracker count draw many little stick figures on the canvas. The more the tracker count, the more figures.  I uploaded a few json files of artists information: darke, sia, joji. And in preload,  I had drake = loadJSON("json/drake.json"); joji =loadJSON("json/joji.json");...  I wanted to access the artist tracker count by: drake.tracker_count. However I couldn't figure out how to convert a user input string "drake" back to variable drake.  So I thought about combining individual artist files into one big artists json file with individual artist object labeled by artist names in strings: "drake", "sia"... and access the tracker_count through artists.artists[input.value()].tracker_count, which was an expression I saw in this documentation.

Screen Shot 2018-10-30 at 3.10.00 PM

Basically I can access the object values by using the dot(.) notation as well as bracket ([]) notation, which solved my problem.

myObj = { "name":"John", "age":30, "car":null }; x = myObj.name;   // x = myObj["name"];


My code: https://editor.p5js.org/ada10086/sketches/HyeGPQI2X

To interact: https://editor.p5js.org/ada10086/full/HyeGPQI2X


live audio-visual techno generator

Among all the music elements we have discussed in Code of Music class up till week 6, I found the topic of  Synthesis most interesting and at the meantime challenging for me. Having studied music theory and played classical piano music for a long time, I found rhythm, melody, and harmony rather old and familiar concepts. Whereas, synthesis, the technique of generating music from scratch using electronic hardware and software, was never taught in my previous theory classes. Having a little bit of knowledge on synthesis from my Intro to MIDI class in the past, I still felt a little hard to wrap my head around the code that applies all these new concepts even after I finished my synth assignment. So I decided to challenge myself and refine this assignment by focusing and experimenting further with some synth techniques. In my previous synth assignment, I drew inspiration from the Roland TB-303 bass line synthesizer and created a simple audio-visual instrument that manipulates the filter Q and filter envelope decay. TB 303 has a very distinct chirping sound which became the signature of the genre acid house and a lot of techno music. Having listened to million songs in those genres, I have grasped on the surface certain patterns in the subtle and gradual changes layer by layer. After discussing with Luisa and resident Dominic, I thought why not expand my assignment into an audio-visual techno instrument with multiple control parameters for myself and other amateur fans to play with and experience the joy of creating/manipulating our own techno track on the go. 

In the beginning, I was completely lost and didn't know where to go about starting this project. Nevertheless, I started experimenting with all types of synth and effects in Tone.js docs, and some ideas started to merge.

I used a MembraneSynth for kick drum and a Loop event to trigger the kick every "4n", to generate a four-to-the-floor rhythm pattern with a steady accented beat in 4/4 time where kick drum is hit on every beat (1,2,3,4). And also connected a compressor to the kick to control the volume. I asked how I could manipulate the bass without changing the synth, and I thought about a most common way when DJs mix tracks is to apply a high pass filter to swoop out the bass sound during transition. Therefore I added a high pass filter to my MembraneSynth controlled by a kick slider and also had the slider change the brightness of the entire visual by inverting the black and white color. I referred to this article to set my filter slider values.  "Low end theory: EQing kicks and bass" : "put a similarly harsh high pass filter on the bass sound and set the frequency threshold at 180Hz again, so that this time you're scooping out tons of bass. "

In my original assignment, I only had one fixed set of notes generated by a MonoSynth being looped over and over, which contains 4 beats of 4 16th notes in each beat(4/4 time signature). After running the code over and over during and after the assignment, the melody was stuck in my head and I started to get annoyed the same notes. I knew that if I were to create an instrument not just for myself, the main melody line needs to have more variety for user to choose from, so it can be more customized. Again, inspired by the virtual TB 303, I really enjoyed the feature of randomizing the notes in the editor, and decided to recreate the randomize function in my instrument so that if users don't like the note patch, they can always keep randomizing to generate new patches until they find one that satisfy them. Therefore, I added a randomize function tied to a randomize button, and looped the MonoSynth notes every "1m"(16 16th notes) with a Tone.Part (funtion(time, notes)) event to pass in randomly generated notes each time user click the button. I initialized 16 16th notes in timeNotes array with each item in the array contains a time and note array ["0:0:0", "Bb2"], and created another synthNotesSet array with all 13 notes in the octave C2-C3 and some 0s as rest for computer to pick from. I accessed each 16th MonoSynth notes by using synthPart.events[i].value to overwrite previously generated notes as well as print out the generated notes in the randomize function, so users can see what notes are being played.I also added a compressor to MonoSynth to control the volume. Same as the previous assignment, I had mouseX tied to Q and the circle size, and mouseY to decay and circle density, but instead of moving mouse to control, I changed it to mouse drag because later I created some sliders for other parameters, changing slider value would interfere with Q and decay as the whole window is my sketch. However, I noticed that when my mouse is dragged over the slider, it would also change my Q and decay value, I want each parameters to be controlled independently from each other, so my solution was to confine the mouse drag for Q and decay within a square frame with the same center as the circle.

I had the square as a visual reference for manipulating the MonoSynth, but it was static and I wanted to animate it somehow to have it reactive to some sound parameter, so I thought about adding a hi-hat layer to my composition to make it sound richer. I tried to create a NoiseSynth for hi-hat but however I changed the ADSR values around, I could never achieve the effect I wanted. Sometimes I would hear the trigger and sometimes it was straight up noise, and it sounded very mechanic, not the hi-hat that I wanted. Instead of using a NoiseSynth, I decided to just use a hi-hat sample and trigger it every "4n" with Tone.event and a playHihat callback function. I started the event at "0:0:1" so the hi-hat is on the backbeat. As I was telling my classmate Max that I was not sure if there is a way to animate the square rhythmically with the hi-hat without manually calibrating the values, which was how I matched the bpm with pumping size of the circle in my original assignment, Max showed me his project 33 Null made with Tone.js, where he used Part.progress to access the progression of an event with a value between 0 - 1, which he then used to synch his animation with the sound user triggers. I was so excited to find out about the trick. I had my circle scaler and square scaler mapped to kickLoop.progress and hihatEvent.progress, so that the pumping circle and square are more precisely controlled by BPM/kick drum/hi-hat, therefore to create a more compelling visual effect. I also imagined changing the closed hi-hat into an open hi-hat with another slider. I tried different effects on the hi-hat sample and ended up using a JCReverb. I wanted to create the tracing circle effect Max did in his project on my square frame when Reverb is applied, but for some reason I couldn't apply it to my sketch. So I came across Shiffman's tutorial on drawing object trails for my square frame. I created a Frame class, and I had rectTrails mapped to the hihat slider value which also controls the reverb, and had rectTrails to constrain the number of trails generated (frame.history.length).

During my experimentation with synth, I liked the fmSynth sound a lot, and decided to add another layer of low pitch synth sound to fill the depth of the overall composition. I wanted to generate a random fmSynth note by keyPressed from the randomized MonoSynth note patch so it doesn't sound too dissonant,  but I also wanted to exclude the rest "0" from synthPart._events[].value, so that every time key is pressed there is note being played instead of silence. I did some research on how to generate one random index from an array but exclude one. And I saw this example . So I created a function pickFmNote() that returns to itself to generate a new note until it is not "0".  I wanted to use FFT/ waveform to visualize the fmSynth going across the canvas. I referred to the source code for this analyzer example, and I was having a lot of trouble connecting my fmSynth to Tone.Waveform. I referred to another envelope example that draws kick wave live from kickEnevelope. I viewed the took the block of code from the source code where the kick wave was drawn and replaced kickEnvelope with fmSynth.envelope.value. The result did not look the same as the example but I was quite surprised to see the effect of dispersing dots when fmSynth was triggered and converged back to a straight line when it was released, so I decided to just go with this accidental outcome.

There is only limited amount of things I could achieve in a week. The more I expand on my project, the more ideas start to emerge and the more I feel compelled to improve it and add more features. Right now I have a finished audio-visual instrument, where users can create their own composition. However, I would take this project to the next step by refining the sound quality, experiment with the envelope parameters and effects more to make each layer sound more compatible with each other, and overall less cheesy and mechanic, as well as adding more controls to turn each layer on and off to generate more variety of layer combinations.

my code: https://editor.p5js.org/ada10086/sketches/rJ2k48z3X

to play: https://editor.p5js.org/ada10086/full/rJ2k48z3X

instructions:

click the randomize button to generate a set of randomized monosynth melody

drag bpm slider to change the speed of composition

drag the hihat slider to add reverb to hihat

drag the kick slider to filter out kick drum

press key 'a' to play an fm synth generated randomly from the monosynth notes set.


Demo1:

https://youtu.be/zmlSP3IMHuk


Demo 2:

https://youtu.be/eZYGB9h9isY

Haunted Photobooth - Midterm Project documentation

Midterm is during Halloween, so my partner Shivani had an idea of a Spooky photo booth with some sensor (TBD) that triggers webcam to take spooky distorted pictures. We started brainstorming by asking ourselves what kind of activities we would want our users to engage at the photo booth without giving explicit instructions or without them knowing what they need to do in order to create surprises and fun. I told Shivani about my experience playing with the mood ring the other day. As I put on the ring the color of the stone on the ring changes depending on my finger temperature and each color represents a mood. So I thought of implementing some wearables that output some individualized messages, that could be fortune or curses, depending on the attributes of the person wearing. Shivani instantly thought about the sorting hat from Harry Potter. That was a moment of excitement when we realized we can have a fancy fortune-telling witch hat as a prop for triggering the camera at the photo booth.

Read More

W6 Interaction response

I had a lot of fun playing with  the Keezy classic recorder+looper and the Sampulator keyboard sampler. I like the Sampulator interface in the way that it looks very neat and straightforward as it visually maps all the samples to each key on the keyboard, with first percussion samples on first two rows and melody on the third row and human voice samples on the last row. There is a lot of possibilities to the sound that users can create and it can sound very rich because there're so many keys to play with.  It also comes with a metronome/time signature and a recorder.

Similar to Sampulator, the Keezy classic operates on smart phones, instead of pressing the keyboard to trigger sound samples, Keezy divides phone screens into 8 grids and tapping each grid triggers a sample. Sample size wise, there are a variety of sample packs but each one can only play 8 samples at a time, as opposed to the greater possibility of sounds generated from a full keyboard. However, an advantage of this is that users can easily locate which grid triggers which sample, and trigger samples they want with higher accuracy. Keezy also allows users to record their own samples and map them onto the grids so that they can create their own simplified MIDI controller to trigger 8 samples of their own, as well as make as many sample packs as they want, which is a cool feature that Sampulator doesn't have.

W6 Singing animal sampler

My inspiration of a singing animal sampler came from the youtube/vine sensation of animal voices singing to pop songs with accurate pitches. The most typical and popular example is Gabe the dog, who barks to tons of hit songs, commercials, and movie tracks. Similar to Gabe the dog, I decided to focus on sampling in music production and create an animal sampler, with a selection of different animal sounds and sample them to generate pitches in a major scale. I found some very distinguishable animals samples from freesound.org:  dogcat, cow, sheep, chicken, crow, trimmed the original clips to have them represent one note(F) in the center of the C major scale, so that the animal sounds don't get distorted as much when the pitch goes higher.

I added a dropdown menu with createSelect() in the DOM, to select between different animals sounds.

My biggest challenge, however, is to get the DOM element to interact with animal animation and sound, which I elaborated more on my ICM blog post.

https://youtu.be/m6F_yL2m_m8

To play: https://editor.p5js.org/ada10086/full/SJ8-14tj7

My code: https://editor.p5js.org/ada10086/sketches/SJ8-14tj7


ICM W6 sketches

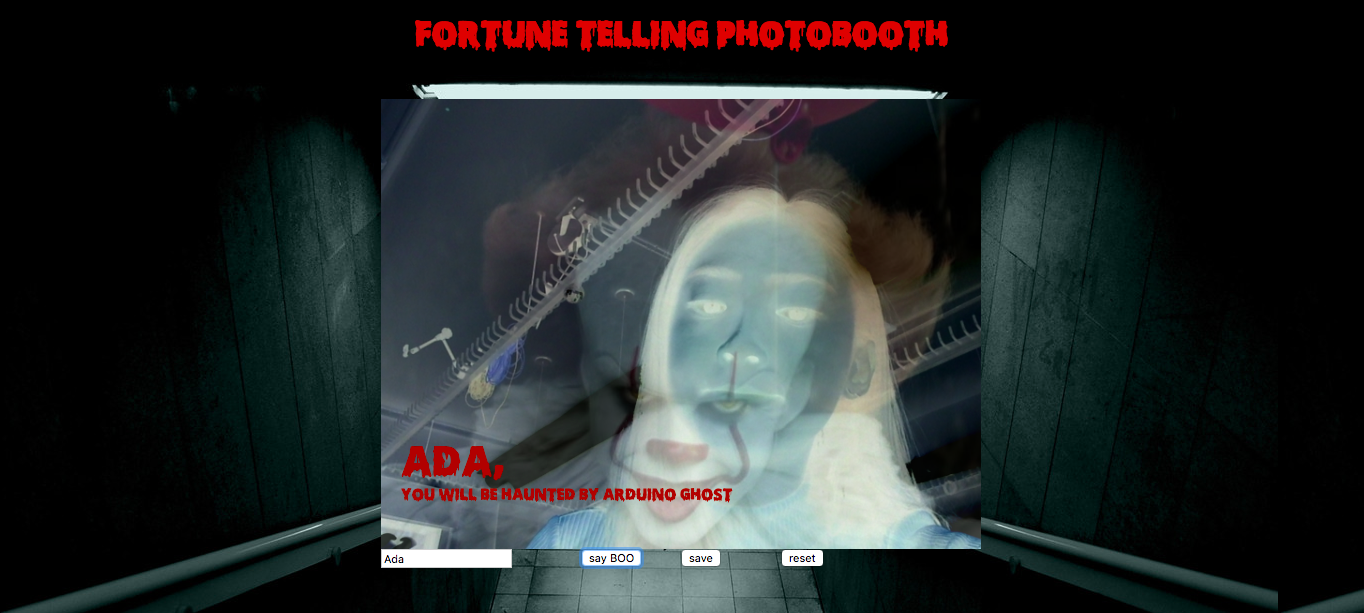
I combined this week's assignment with myHalloween themed Pcomp midterm. The idea is a spooky photo booth that tells fortune. Inspired by the transparency example , I thought about displaying a half opacity ghost/demon image as a filter on top of the webcam image.  The DOM elements I added from p5 sketch are: a video capture (webcam = createCapture(VIDEO)) ,  a text input ( nameInput = createInput('type your name')), a button that calls takePic to freeze the video and display messages, a button that saves the pictures, and a button that reset the webcam back to active. The text input and button elements on the webpage are controlling the photo booth actions on the canvas with different callbacks. I also added a "Fortune telling photo booth" header inside index.html, and used @font-face to set the header font and added a background image inside css. My sketch: https://editor.p5js.org/ada10086/sketches/rksofdUim

To play photobooth: https://editor.p5js.org/ada10086/full/rksofdUim

Screen Shot 2018-10-19 at 7.28.51 PM


Another project I made using DOM and HTML is an animal sampler for my Code of Music class. I created a drop down menu for selecting animal sounds using sel = creatSelect(). However, when I call sel.value() to get the animal name which I used to store my preloaded animal sound sample, I can only get a string: 'dog', 'cat', 'cow',etc. So I was wondering if there is a way to convert strings to variable names(to get rid of the ' ' ). I read somewhere people suggested using  window[] or eval(), but none of them solved my problem. I had to find a way to use the string value, to load the sound and the image according to the string being selected. Therefore I have:

selectedAnimal = sel.value();

animal = loadImage('animalImage/' + selectedAnimal + '.png');

"F1": 'animalSound/' + selectedAnimal + '.wav'.

to include the the sel.value() within the file name when I load the image and sound files instead of calling a preset variable dog, cat, cow. However, this way I had to convert my sound and image files to make sure they have the same extension png and wav.

Another problem I had when I added the dropdown menu is I cannot change the size, of the texts in the menu, the size() function only changes the size of the menu box, but the text stays the same, I tried to change it in CSS and html file with font-size but nothing changed.

To get around with selecting animals using the dropdown menu, I thought about displaying all the animal images on the webpage underneath the canvas as image elements: dog = createImage(), and have dog.mousePressed() to select the sound sample, code.

However, I couldn't get the absolute positioning of the images correct. I was wondering how to set the absolute positioning using position() as well as in the html/css file.

One problem I had for both sketches is that when I tried to set the canvas to the center of the window, instead of using (windowWidth/2, windowHeight/2), I had to use ((windowWidth - width) / 2, (windowHeight - height) / 2), which confuses me a lot.

To play: https://editor.p5js.org/ada10086/full/SJ8-14tj7

My code: https://editor.p5js.org/ada10086/sketches/SJ8-14tj7


W5 sketches

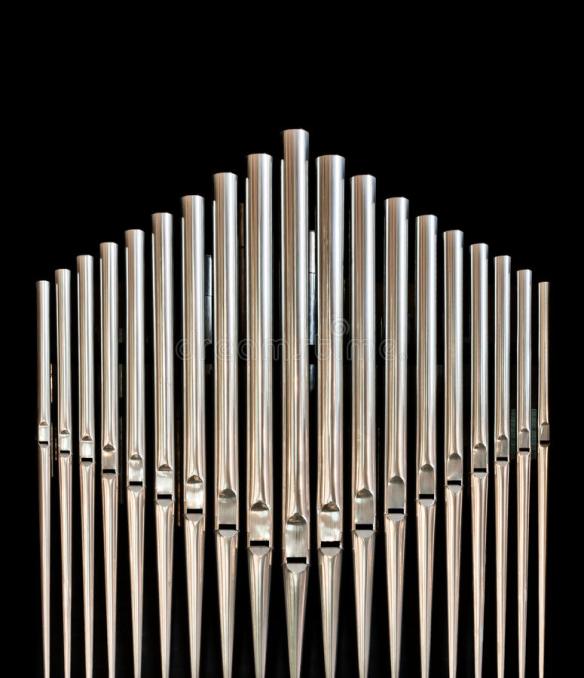
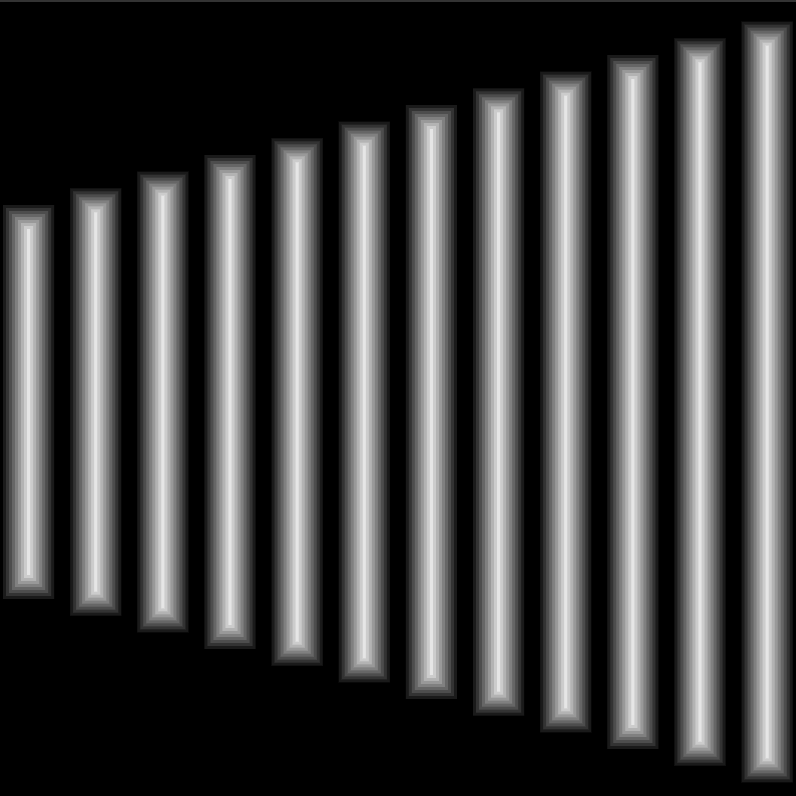
My first sketch are an array of pipes: I started off thinking about combing my ICM sketch on objects and class with my Code of Music harmony sketch, to have my objects tied to my harmony transposition in some way. So I thought about making gradient strips that resembles certain instruments, and the lengths of strips corresponds to the steps of transposition.

These are my visual inspirations:

Image result for harp

Image result for organ pipe

Therefore, as I intended to create an array of strings/pipes, at incrementing x location and incrementing height,  I created a Pipe class with constructor _x and _h, with a display function to display each pipe as an array of rectangles reducing in size and increasing in brightness, to achieve the gradient effect, and then initialized an array of pipe objects, and have each pipe's mouseX and height tied to index i to have them evenly spread across the canvas. As I move mouse across the canvas to the right, more pipes are displayed, corresponding to higher pitch therefore bigger transposition steps in harmony.

Screen Shot 2018-10-14 at 1.16.31 PM

My sketch: https://editor.p5js.org/ada10086/sketches/SytG2QgsQ


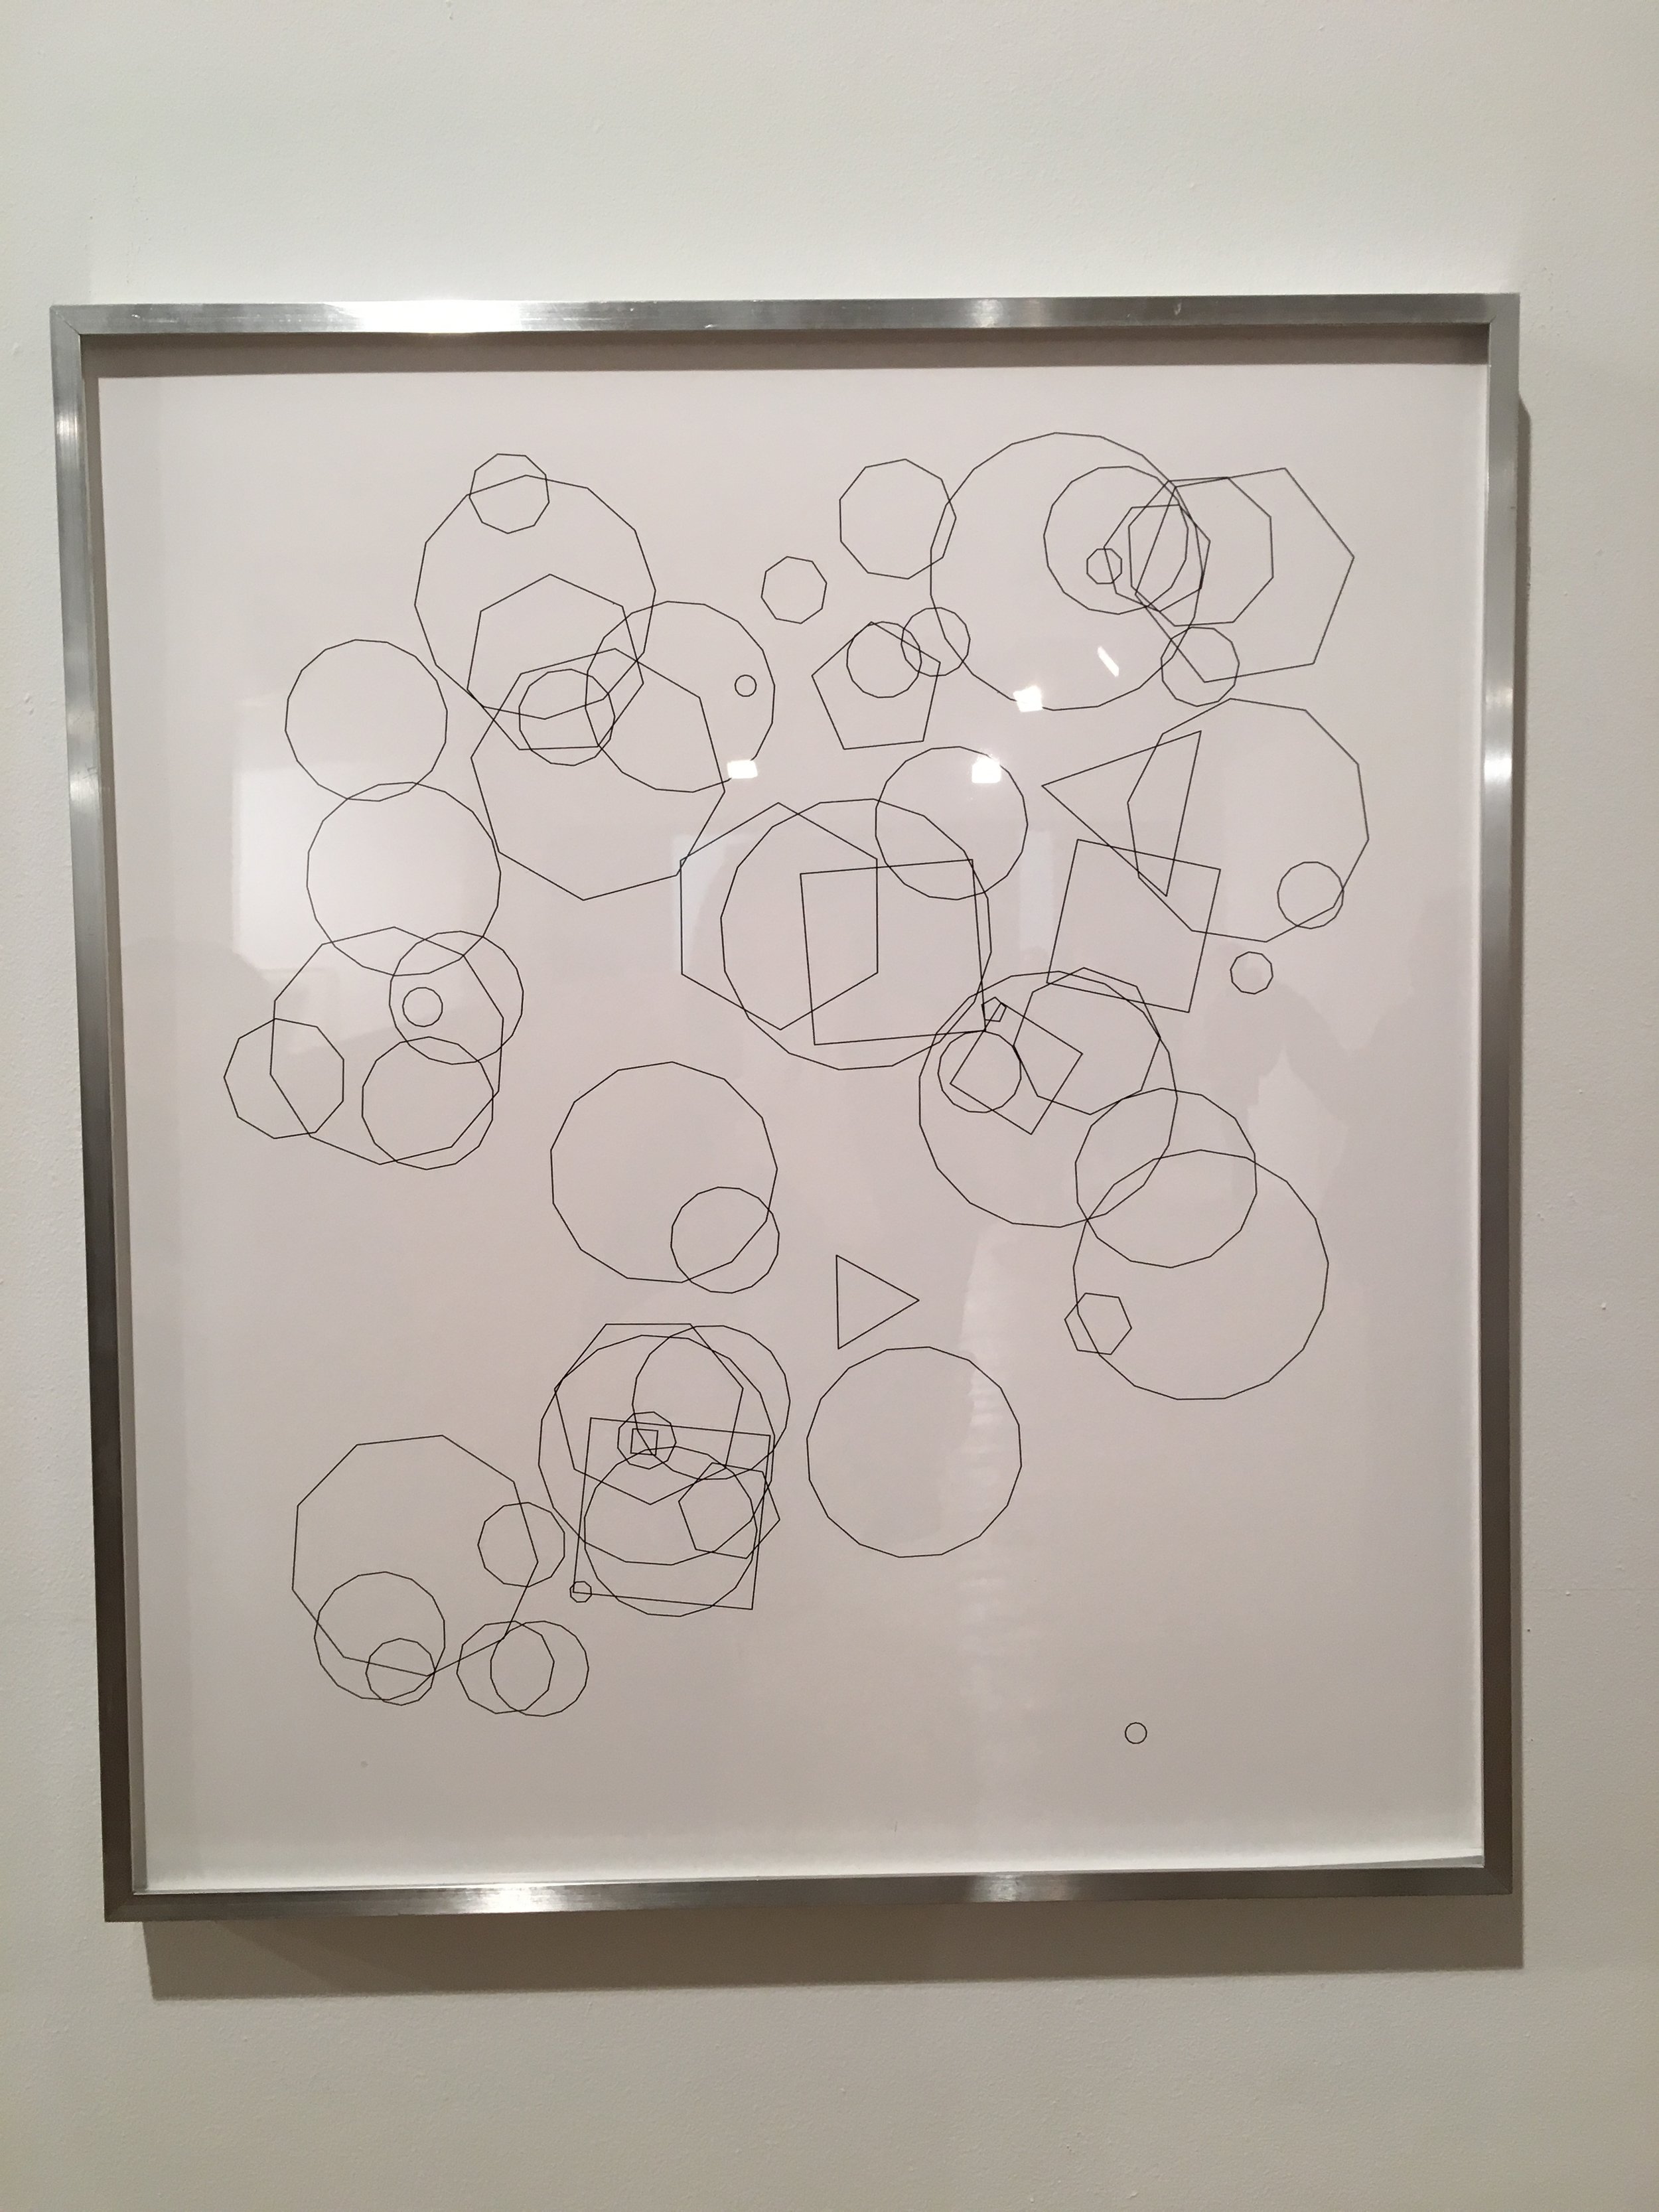
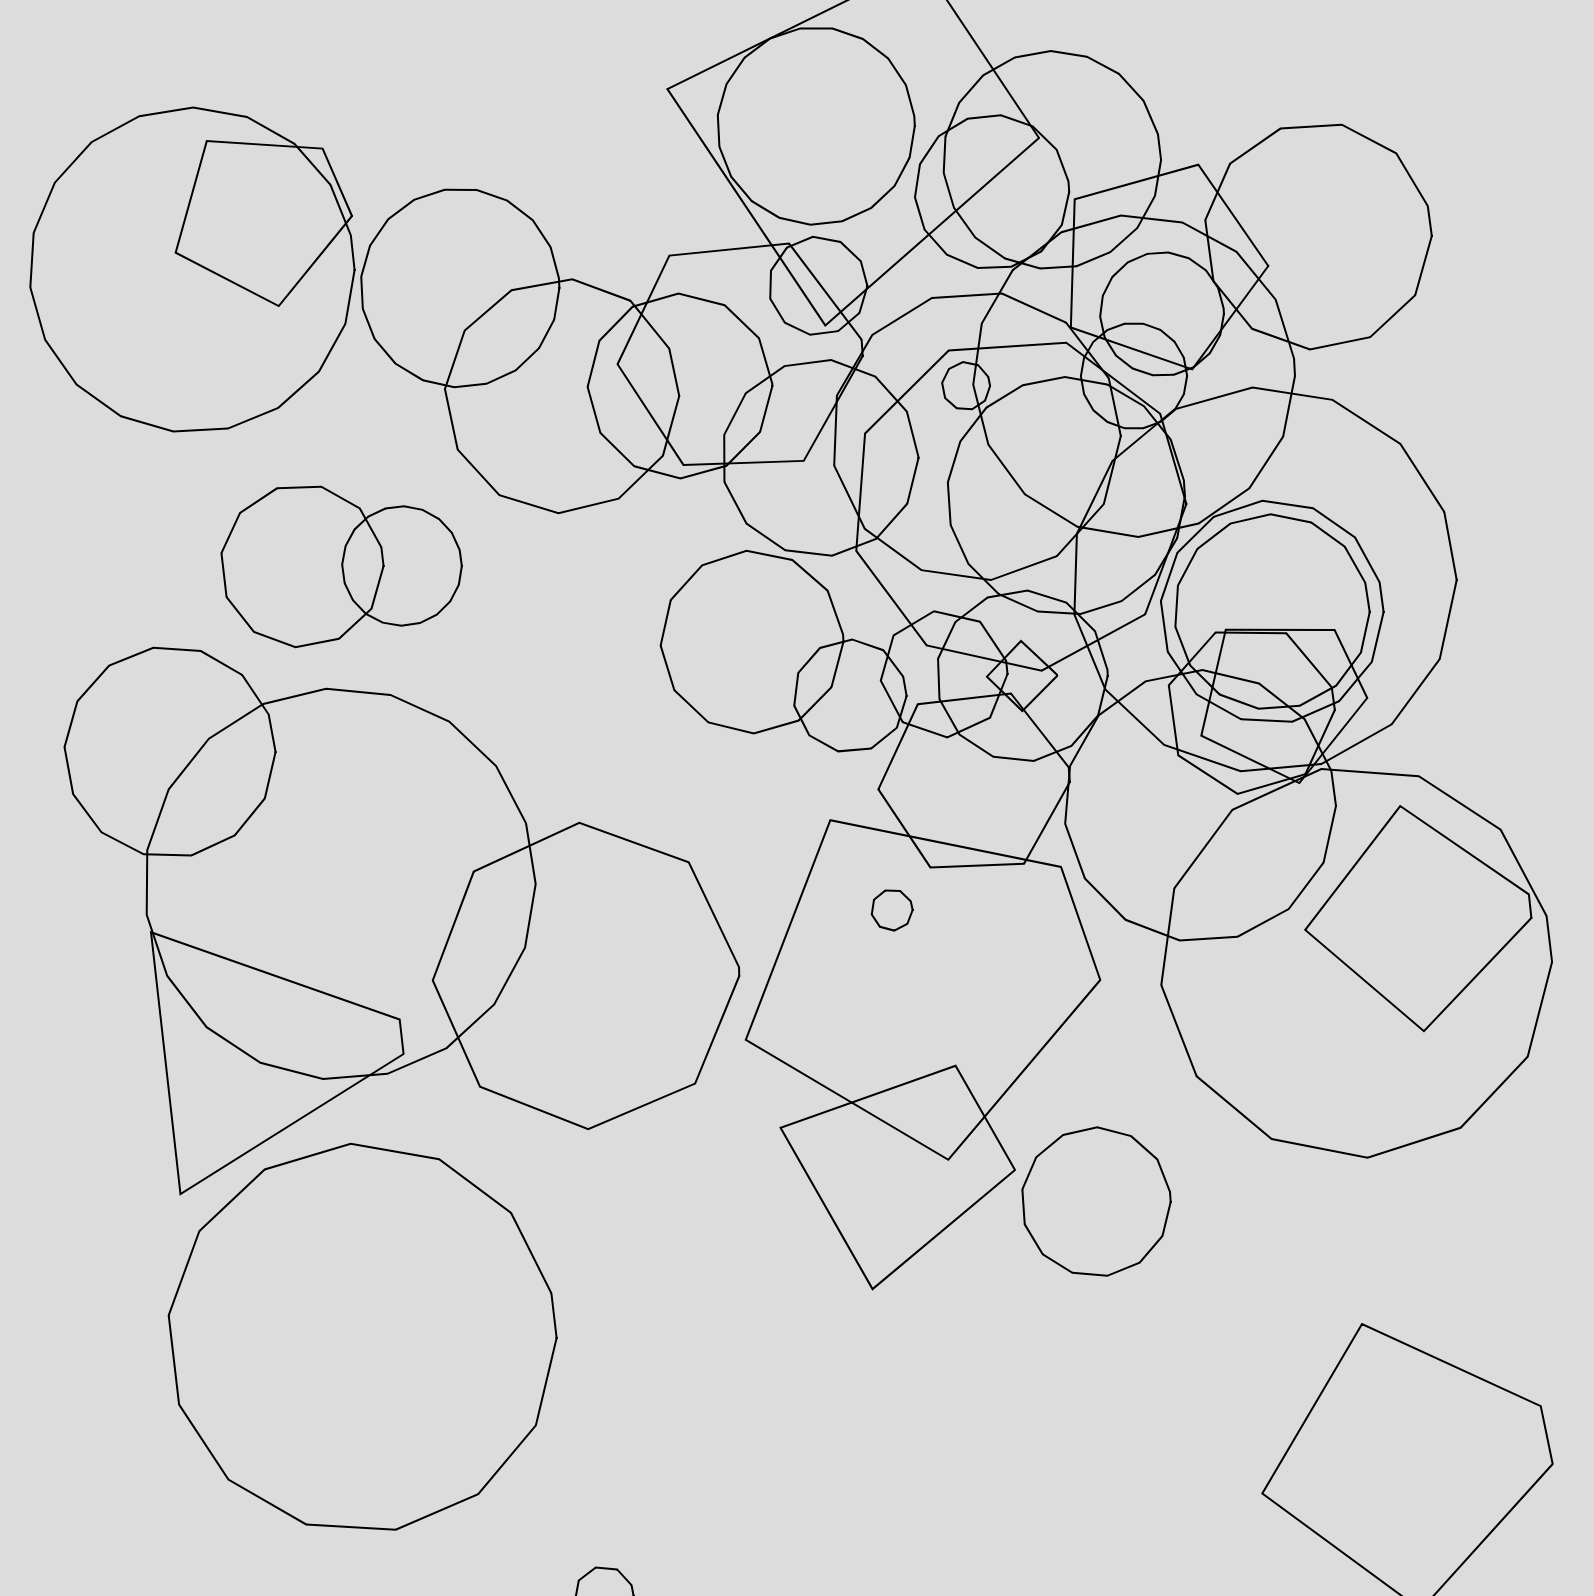
My second sketch is drawing random polygons with a Polygon class.

I drew my inspiration from this piece at Open House at Mana Contemporary over the weekend. Unfortunately I only took a picture and did not remember which artist created it, but I thought about recreating the piece with Polygon class and randomize some polygon parameters.

IMG_8003

Screen Shot 2018-10-15 at 11.29.02 AM

My sketch: https://editor.p5js.org/ada10086/sketches/HJPGi7MoQ

W5 Harmony Interaction

My goal for this assignment is to create a drone piece, with a bass line with the same repeated note and a top melody line, the interaction was to move the mouse across the canvas, which is divided by 12 strips, to transpose the whole piece each time by half step every time a new strip is displayed. My inspiration for the Pipes sketch from ICM. Because my sketch looks like a pipe organ, I used synth.set(), to apply a triangle oscillator to make it sound more like an electric organ.

Screen Shot 2018-10-14 at 1.16.31 PM

Challenge 1

I couldn't figure out how to use Tone.Event or Tone.loop to loop my set of notes, which I was also not sure if it was achievable. My guess is both events loop the callback every "16n"(defined), which means synth.triggerAttackRelease() (triggers only one note) in callback function is called once every "16n"; however what I wanted to achieve was to play a fixed set of notes every "3m", therefore Tone.Part seems to be the solution ? 

Challenge2

My second problem then was to figure out how to transpose the entire array of notes in Tone.Part, as all the triggerAttackRelease() functions are called before setup, and my notes were passed in into the callback function in Tone.part event. I'm not sure how to get the notes variables from that function (use dot syntax?) so as to change the steps of transposition constantly in my draw loop with mouse location. 

My harmony sketch: https://editor.p5js.org/ada10086/sketches/HkXF3s0cm

My visual sketch: https://editor.p5js.org/ada10086/sketches/SytG2QgsQ

Combined final sketch(transposition not working yet): https://editor.p5js.org/ada10086/sketches/rJRxVxZiX

Week 5 Harmony Interface

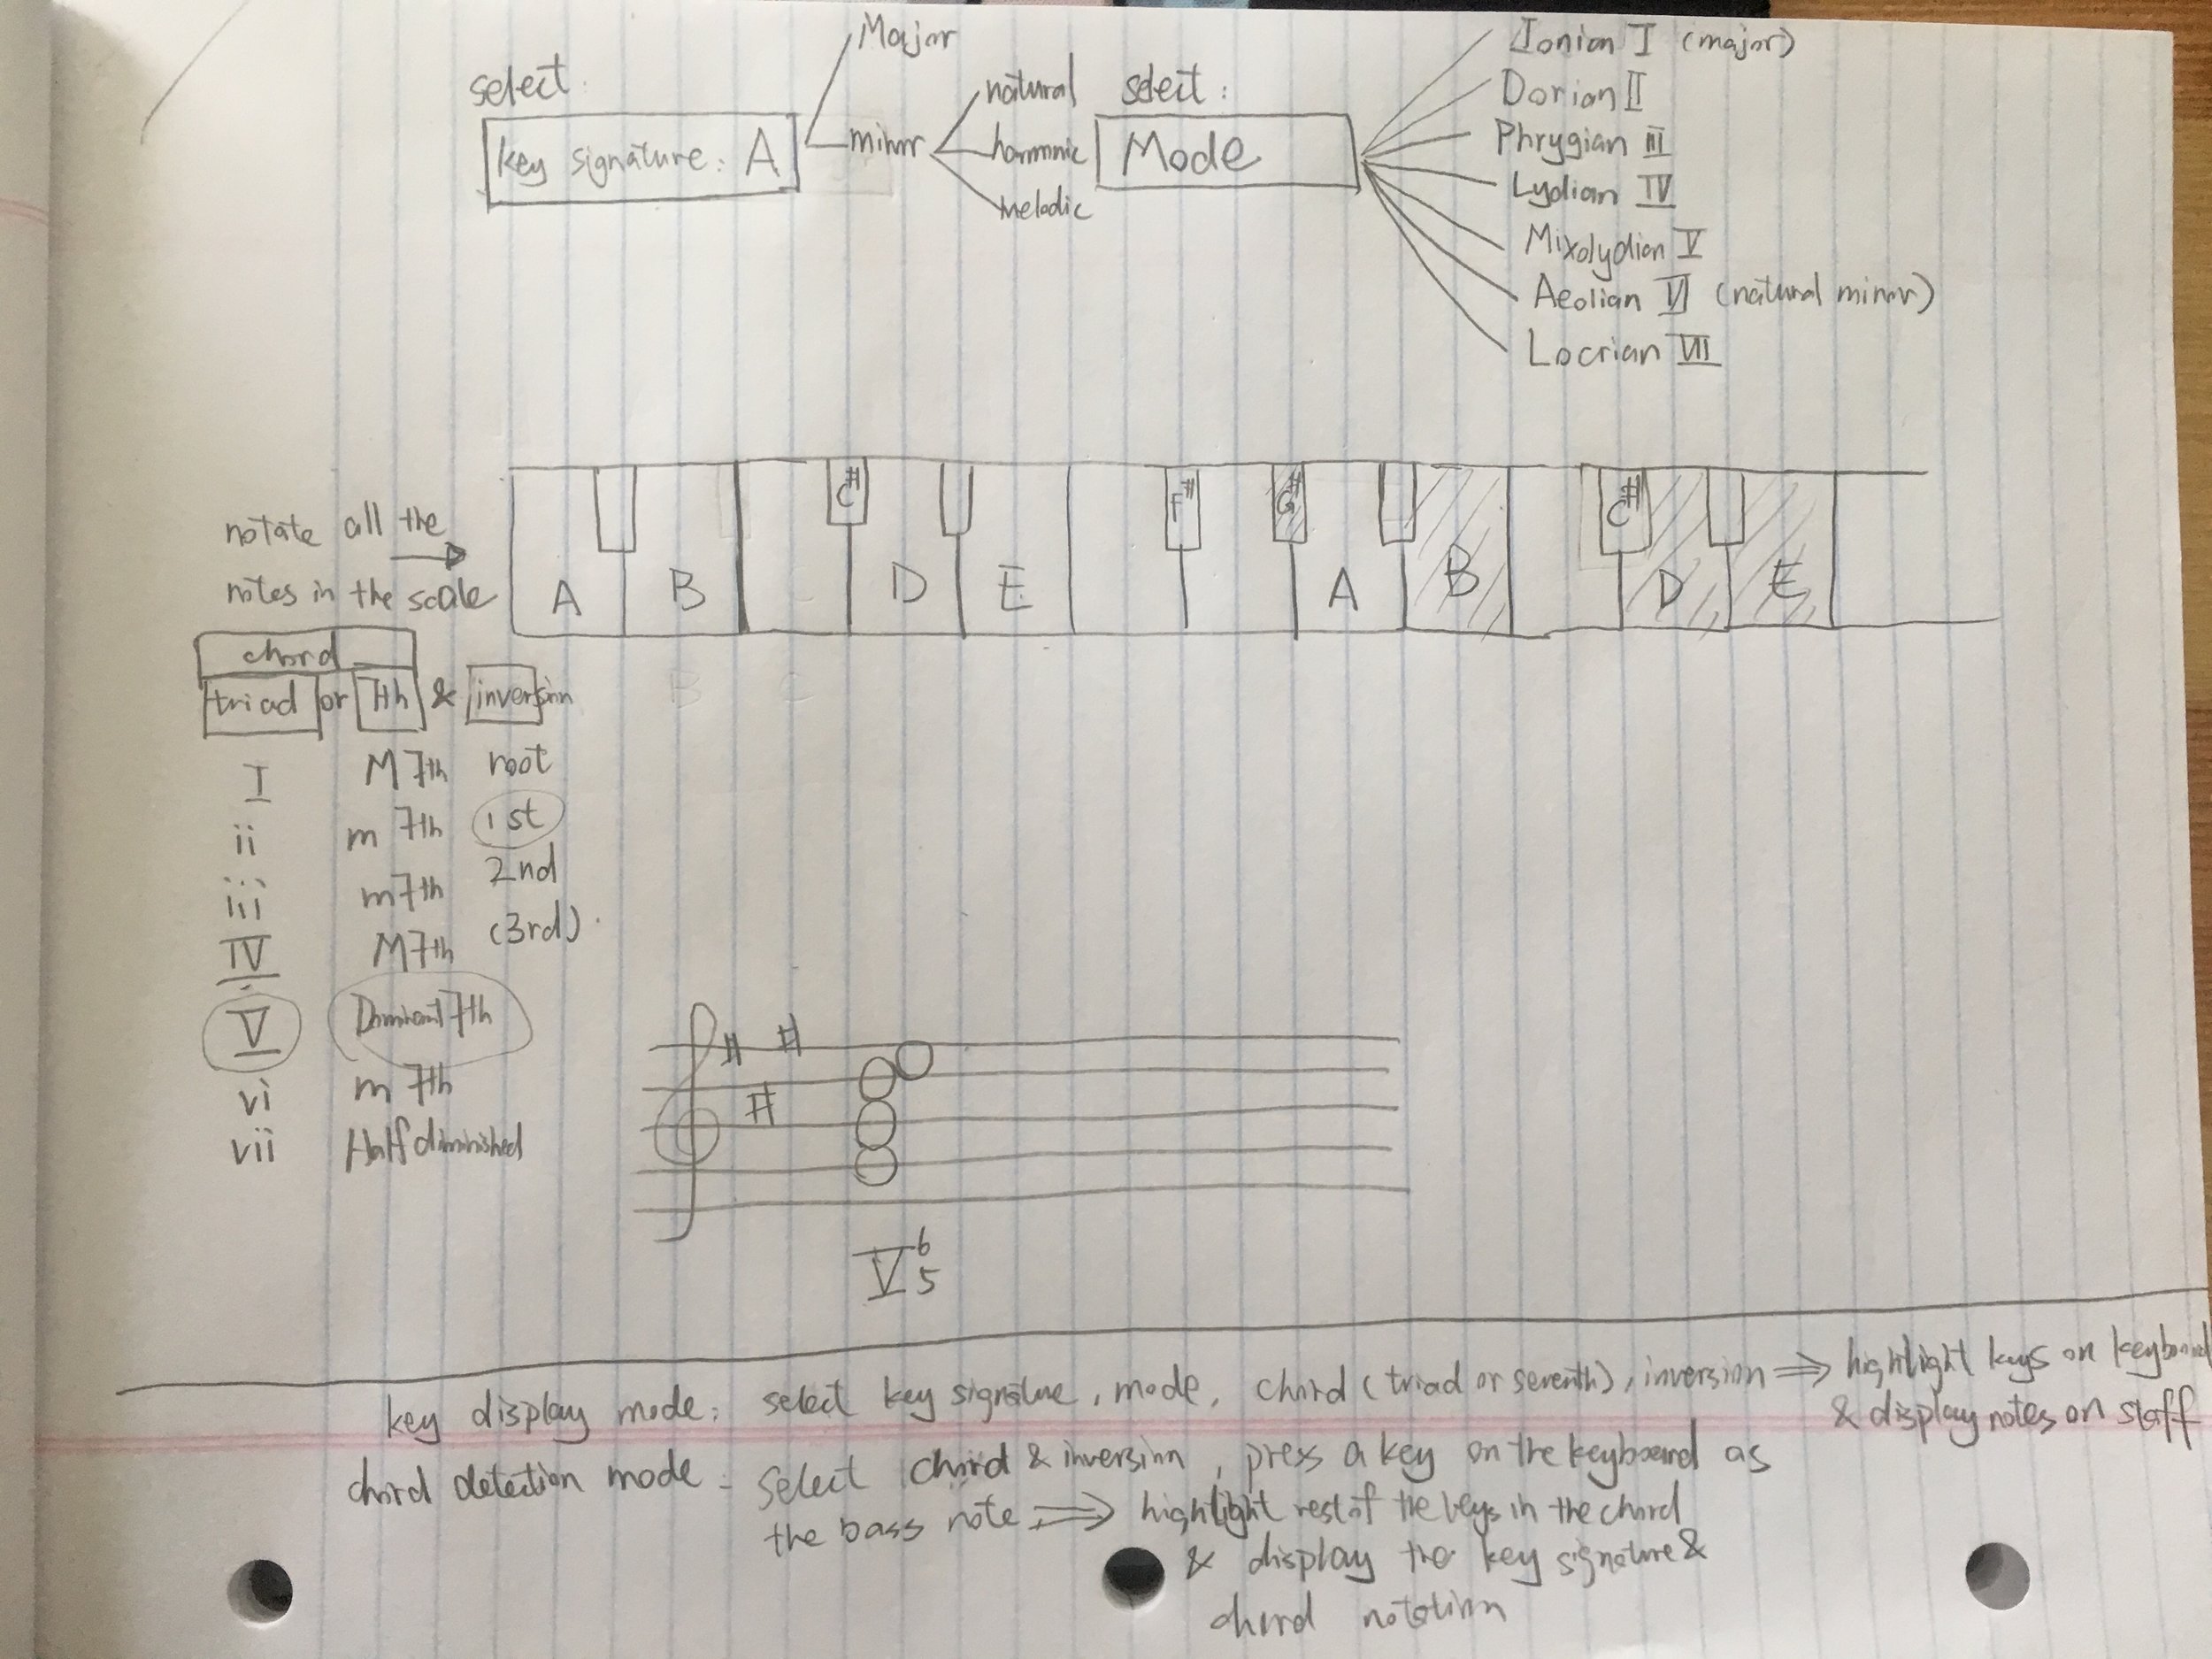
I like how intuitive this chord interface is for displaying all the major and minor triads on a keyboard and distinguishing the sound qualities between the two types of chords.  However, I think it is overly simple and some information can be added on the interface to make it more useful as a tool for music learners, educators and composers. The purpose of this interface is implied in two modes: chord notes display mode and chord detection mode. First mode is to easily locate all the notes in any given key signature, scale or mode, degree of chord scale and inversion from the drop down menus, and display all the  chord notes on the keyboard and the staff. The latter mode is to detect key signatures and the rest of the notes in a chord given the bass note of a chord being pressed on the keyboard, the degree of scale and inversion selected from the drop down menus.

IMG_7977

There isn't too much of a difference graphic wise, only there is a longer keyboard with a five-line staff  underneath and a few drop down menus are added for all key signatures, all modes on top, and chord, which can be either triad or 7th chord, and its inversion.

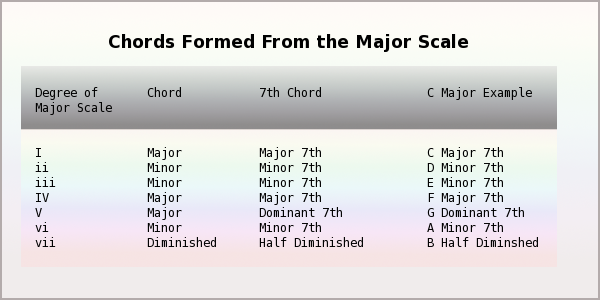
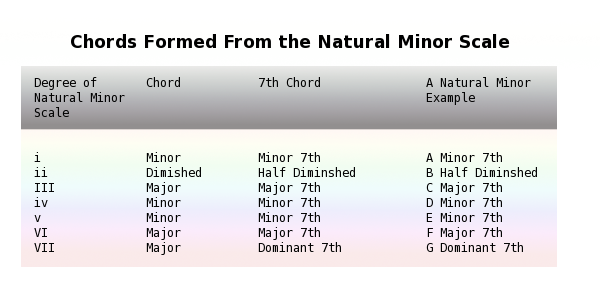
The list of items in each drop down menu differs according to which key and mode or chord degree of scale and inversion are selected, determined by these charts:

Related image

Related image

Image result for mode chords

Having learned music theory and played instruments many years, I found this interface could be very useful in music theory education as it lists all the possibilities and combinations of any chord in any key and mode, highlights all the notes and display the chords and visually describes the relationships between chords. For composers, this could also be helpful when they are picking chords for their chord progressions, so they can locate each notes in the chords they want to use more accurately and quickly without having to do the conversion and mapping in their head.


W6 Lab

For application, I previewed two-way serial communication, and took one of my animation sketches from ICM class and have it controlled by Arduino.

In my original p5 sketch, I have two sliders one controlling the scaling speed and the other controlling the rotating speed of the squares, and also a button changing the color of the squares randomly. Each controlled by mouse dragging or clicking. So I thought it might be a good sketch to apply to serial communication as I can replace mouse interaction with potentiometers and button on my Arduino.

Read More

Week 4 Synth composition

My inspiration for this assignment is the Roland TB-303 bass line synthesizer, which creates a very distinctive squelching sound and is present in a lot of music I listen to. My goal was to regenerate a sound as close as possible to TB 303 with synth on Tone.js, by creating a repeating melody pattern and manipulate two of the variable parameters on the original synthesizer (filter envelope decay, and cutoff frequency or Q(resonance) ) and to have those parameters also manipulate my sketch on canvas. I looked up some characteristics of the synthesizer and found it is an analog subtractive synth that creates Sawtooth and square wave only, with no LFO, and a 24dB low pass resonant filter, non self oscillating. Both the amplitude envelope and the filter envelope have a sharp attack and exponential decay. With that goal in mind I played with a virtual TB303 synthesizer in the browser: and came up with a melody patch: https://soundcloud.com/chuchu-jiang/virtual-tb-303

Challenge:

  1. My original approach was to create a subtractive synth with Tone.oscillator and apply a filter, an amplitude envelope, and a filter envelope manually. However,  I couldn't figure out how to have an oscillator play a set of notes (an array of notes I assigned) generated with the same filter and envelopes(so I can later manipulate the whole melody with these parameters), because notes are passed in at the beginning: osc = new Tone.Oscillator("F2", "sawtooth");  and triggered separately with ampEnv.triggerAttackRelease(); and filterEnv.triggerAttackRelease(); ,where I cannot pass in a set of note values. I found a way around this problem by creating a MonoSynth instead, which has all the subtractive synth features built in(oscillator, amplitude envelope, filter and filter envelope), so that I can later pass my patch of notes in synth.triggerAttackRelease(note, duration); .
  2. I am still using Tone.Transport.position.split(":") to get position of beats and notes and Tone.Transport.scheduleRepeat() to play notes repeatedly, I used a nested for loop for 4 bars of 4 16th notes, which was a little bit redundant. I was exploring other ways of scheduling how to play a loop of different notes using Tone.part
  3. As I was trying to manipulate the synth features as well as my sketch while the patch is being looped, I realized I need to place those variables in the draw loop. Since I had the all the features of MonoSynth constructed in setup, I had to find a way to manipulate them in draw repeatedly. My first attempt(code) was creating new Tone.Filter, new Tone.AmplitudeEnvelope, and new Tone.ScaledEnvelope in draw and have  synth.connect(ampEnv);. but the sound would stop after a few loops, with some delay and noise and mouse location doesn't seem to change in Q or f values doesn't seem to affect the sound.  So my second attempt(code) was moving the whole MonoSynth constructor into draw loop, and the interaction seemed to work but still sometimes the audio loop would stop for a while before continuing to play. I was wondering if the delay in sound has something to do with the values I put in.   ===> solved: putting all the MonoSynth parameters in setup overloaded my browser causing glitch in sound, so I accessed the parameters by using dot notation: synth.filter.Q.value = q; and synth.filterEnvelope.decay = d;

At the end I combined my MonoSynth with my 2D toroidal flow sketch  and here is my final sketch .

https://youtu.be/K4LC2gTjgbQ

W4 Wave Sketch

I took my code from the Code of Music class' assignment and reworked it to add some interaction elements. I expanded my code from this sine wave example by creating a wave class using a constructor function and created 2 arrays of 8 waves objects, one array moving to the left and one moving to the right, and passed in wave speed, wave period, wave y location and wave color associated with the index of the array. I kept my setup and draw loop as clean as possible by using array of objects and kept most of the code inside the constructor function. I added mouse interaction so that when user click on the left or right half of the canvas, it slows down or speeds up the wave movement. At the same time when mouse click is at the top or bottom half of the canvas, it increases or decreases the wave amplitudes.

As I was creating the wave objects, I came across two different ways of creating objects in p5js, one is using a class, the other is using constructor function. It seems like either way works, but I was a little confused about the differences between the two methods.

To play here: https://editor.p5js.org/full/rJIWWa1qQ

code:https://editor.p5js.org/ada10086/sketches/rJIWWa1qQ


W3 Interactive Melody

I had an idea of mapping 8 different synth tones to keyboard keys asdfghjk, and extract the waveform properties from each synth tone using FFT, and display each tone vertically as a line across my canvas like this example: https://p5js.org/reference/#/p5.FFT. So each time a key is pressed, the relative note and line is triggered. I used the syntax from the example. However I couldn't get it to work, nothing was drawn on the canvas when I applied the example code. Later I realized, I was creating sound with tone.js, which is a web audio framework separate from P5.sound, therefore the tone.js and FFT functions in P5 sound would not be compatible. So I looked up FFT on tone API . However, I couldn't find any documentation on how to get an array of values from the function like the P5 example. The example codes in tone are very limited. So I changed my approach, instead of extracting properties from tone.synth(). I decided to sketch the waveforms manually and have each synth note trigger the wave. With that approach, I made two sketches. One for audio and one for visual.

With the visual sketch I have the certain parameters of the waveforms increment or decrement as I go down the lines. I referred to this sine wave example to and created a Wave object and generated an array of 8 waves, passing in wave speed, wave period and wave y location.  My biggest challenge for this part was to create an array of objects as the relevant topics have not yet been covered in ICM class.

With the audio sketch, I first used function keyPressed(){}:

function keyPressed(){ if (key === 'a') { synth.triggerAttackRelease("C4",0.1);

I played around with synth.triggerAttackRelease() and function keyReleased(){}. however, its either the sound stops before I release the key or it goes on forever.

I realized I wanted to achieve the effect that when key is pressed, the synth is played continuously, and when key is released, synth stoped.  So I used if statement within the draw loop:

if (keyIsPressed & key === 'a') { synth.triggerAttackRelease("C4", 0.1); }

I was able to hold down a key to play a note, but it doesn't sound as nice as the synth generated in the keyPressed function, there was a little buzz noise. 

And the issue I had with both approaches was I couldn't get multiple notes to play at the same time, ie to play a chord. There was only one note at a time even though I held down multiple keys on my keyboard.  ==> solution: use polysynth , updated synth code

My code: https://editor.p5js.org/ada10086/sketches/rkS9kvhtQ

To play fullscreen: https://editor.p5js.org/full/rkS9kvhtQ

Video:

https://youtu.be/hOIvTyy9OEI


W4 Lab

To apply all the topics we covered in the past two weeks, I came up with a 4/4 servo metronome which applies the concepts of digital output, analog input and analog output(PWM), tone() and servo.

Read More

W3 Reading reflections

One of my favorite quotes from the chapter Design Meets Disability by Graham Pullin, is "it is technology as a means to an end, not an end in itself ". "Design depends largely on constraints." - Charles Eames's disability inspired design also catalyzed a wider design culture. Constraints arise from both user needs and desires and from technical feasibility and business viability. A good design indicates a healthy balance between problem solving by recognizing the constraints and exploring freedoms by challenging the constraints. There are a lot of tensions between design for fashion and design for disabilities. The positive image of disability is achieved without discretion(invisibility) in the field of eyewear while design of hearing aids indicates priority of invisibility, and its functionality is in conflict with its miniaturization. Other wearable devices for disability such as prosthetics could support more positive image of disability, through emulating the approach of eyewear.

Read More

W3 Observation

As I commute everyday by NYC subway, I have observed as well as personally experienced the frustrations from millions of subway riders swiping metro card at the turnstiles. According to MTA's answer to how to use metro card on the subway, "With the MetroCard name facing toward you, quickly swipe your MetroCard through the turnstile in one smooth move. Walk through when the turnstile screen says "GO." It sounds fairly intuitive and simple, get the direction correct, swipe and go, which aligns with my assumption of how to use the metro card in order to get into the station.

Read More

W3 Sketch

I first created a static sketch with a loop of hollow squares. Then I thought about making it more dynamic by rotating and scaling it. I created two sliders , one controlling the rotating speed and the other controlling the scaling speed. and one button to generate a random color for the squares. My original intention for creating the slider was to use if (mouseIsPressed){} because it is used to test if mouse is being held down. So when I'm holding down the mouse dragging the slider, the code inside if (mouseIsPressed){} should be executed. However, I don't know why it did not work. So I referred to the example code for slider and it worked like a charm.

Code: https://editor.p5js.org/ada10086/sketches/HJHOLHEFX

W2 Rhythmic composition

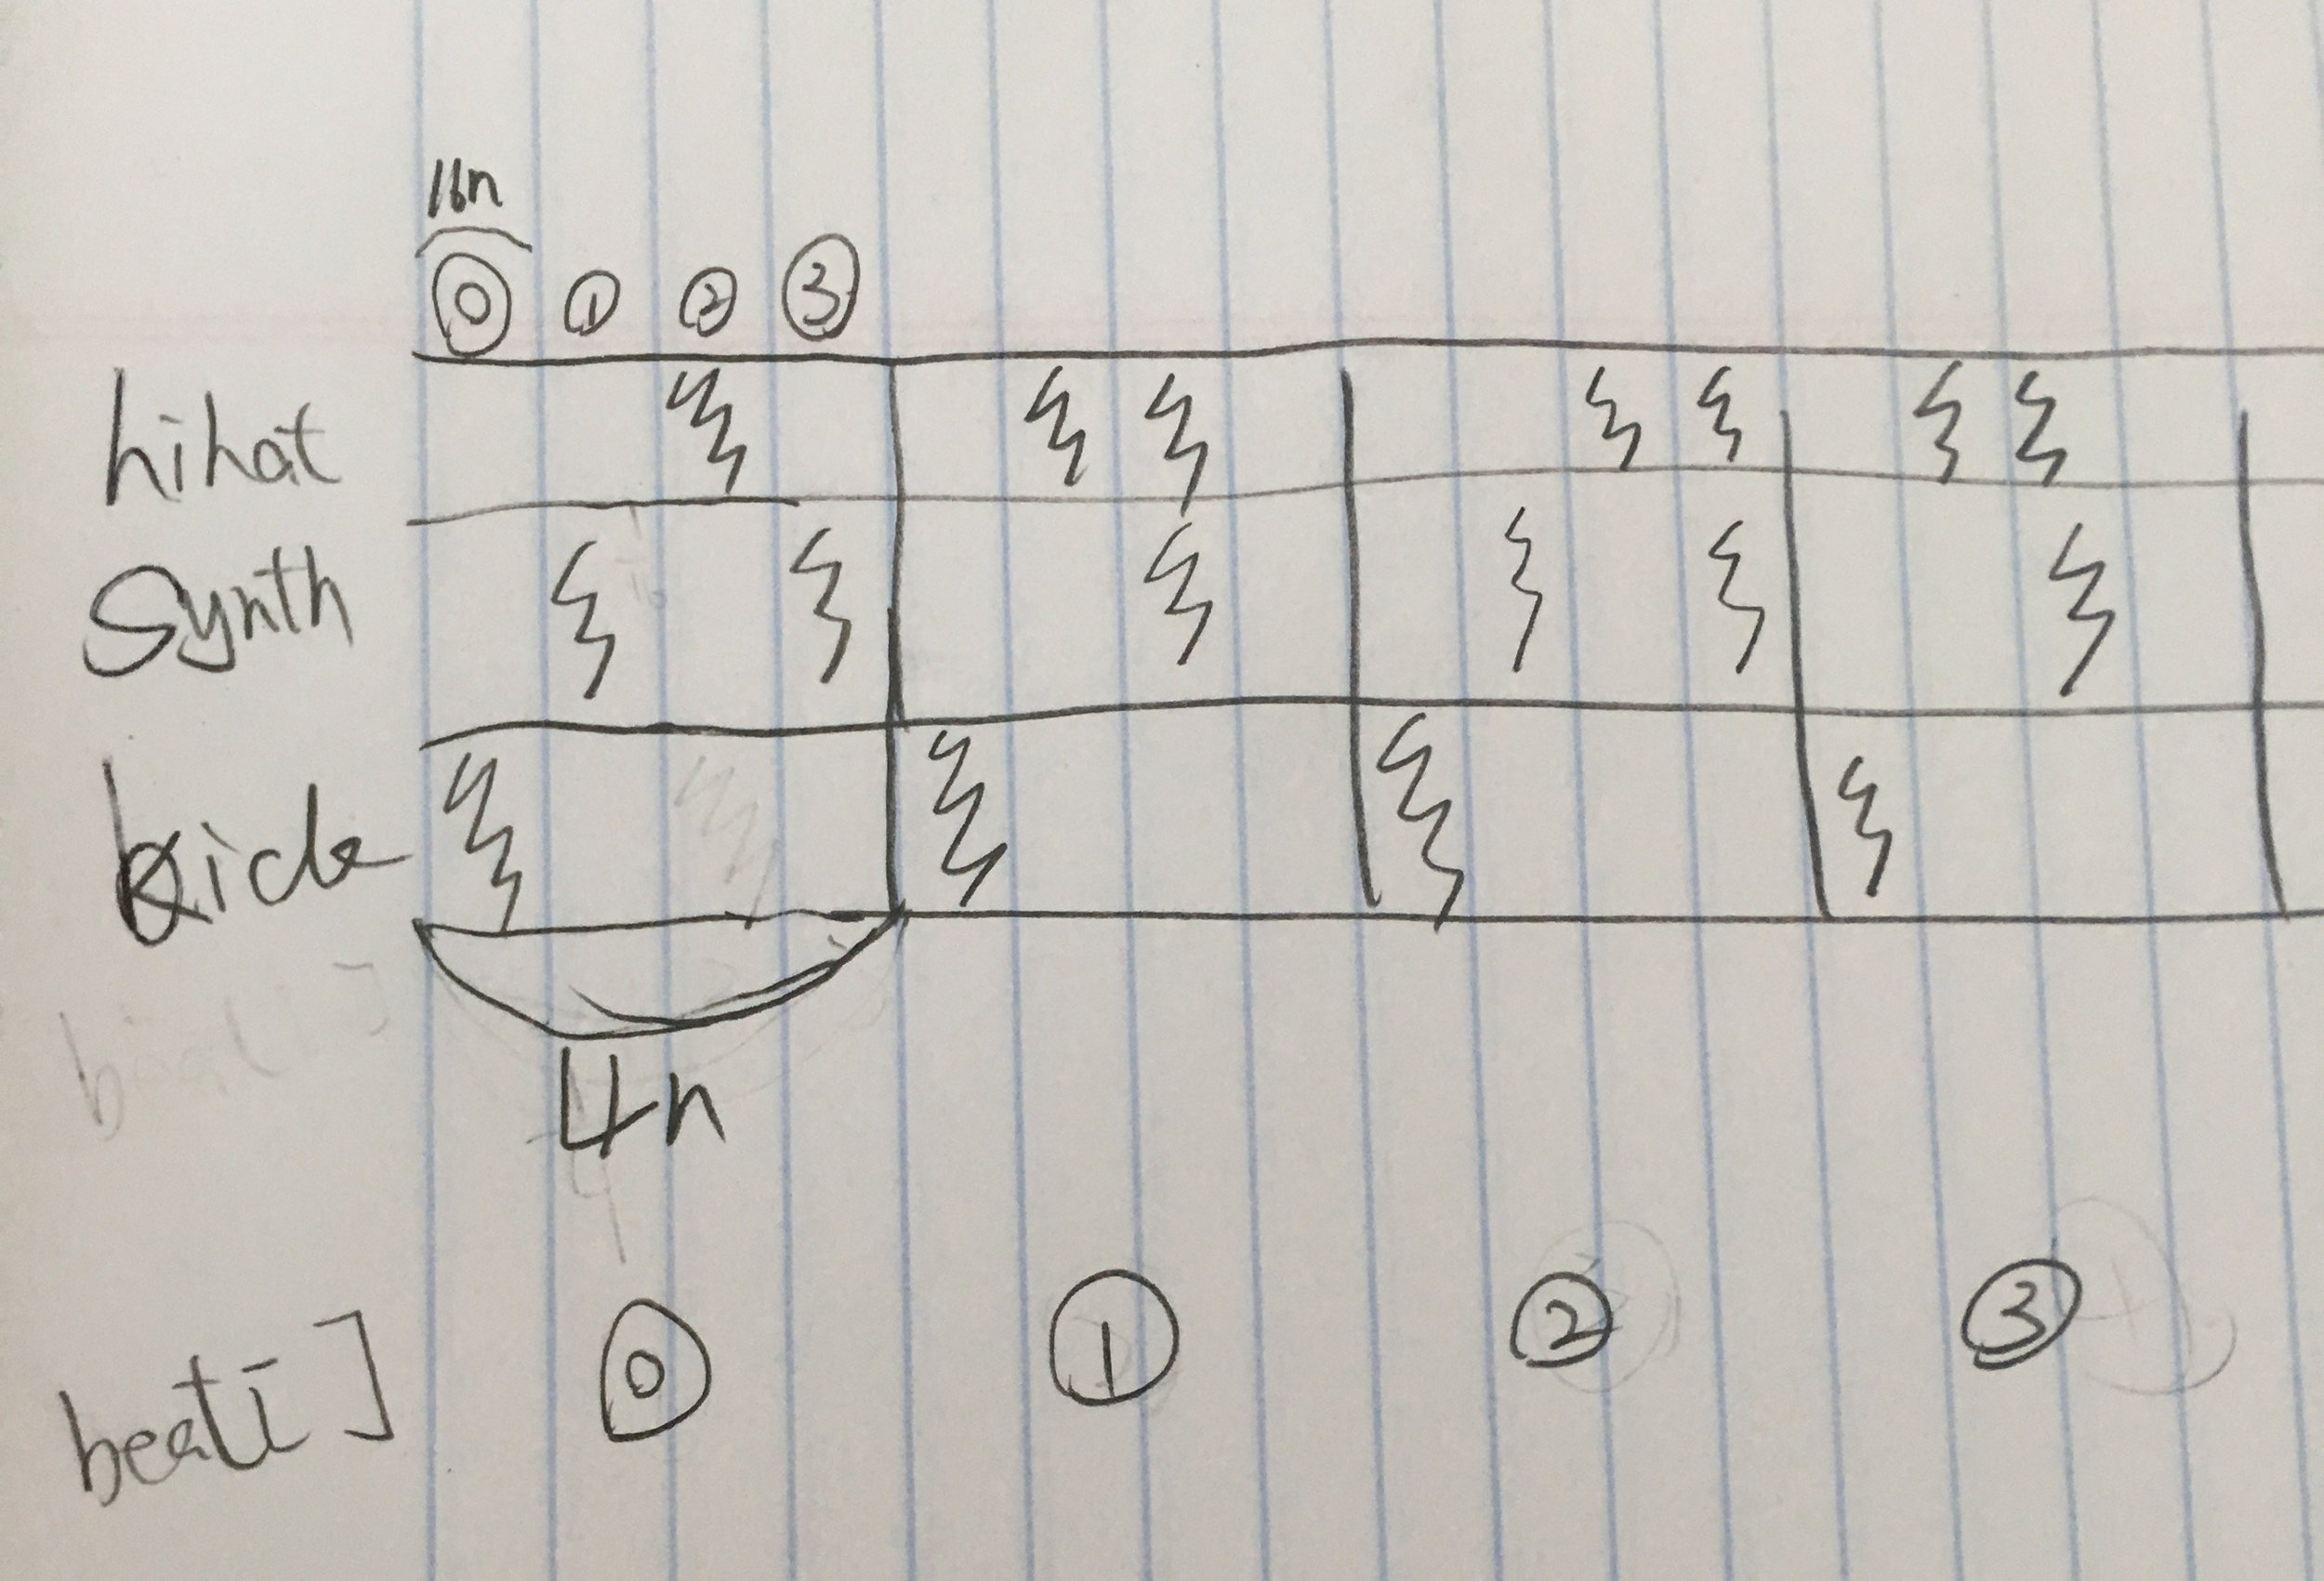
My rhythmic composition is a techno beat loop, including three instruments: a hihat, a synth bass, and a kick drum. My time signature is 4/4. Each kick marks one beat, whereas synth changes its pattern every 2 beats, and hihat every 4 beats.  I subdivided each beat (quarter note) into 4 16th notes, as synth and hihat are arranged as quarters in every beat. I used Tone.Transport.position.split(":")[] to get the current position of beat and 16th note, however, the position of 16th note is not returned in integer[0,1,2,3] . Therefore, I had to convert it into integer using | , to get the exact 16th note position. I have one function for each instrument to call play as they are repeated in different duration(4n,16n). So for the first beat [0], for example, when beat == 0, 16th == 1 and 3 for synth, and 16th == 2 for hihat, and so on and so forth, I arranged the rest of the beats according to this diagram. img_7665.jpg

code: https://editor.p5js.org/ada10086/sketches/By5fJM4KQ


W2 Design rhythm interface - The hmtz hmtz train

As I was commuting on a train thinking about the elements of rhythm, I noticed that each time a chain of cars passes by a gap or a bump in between two sections of the train track, it would create a rhythmic bumping noise like the one in this video: https://youtu.be/MPPNqhf8fRs?t=29s

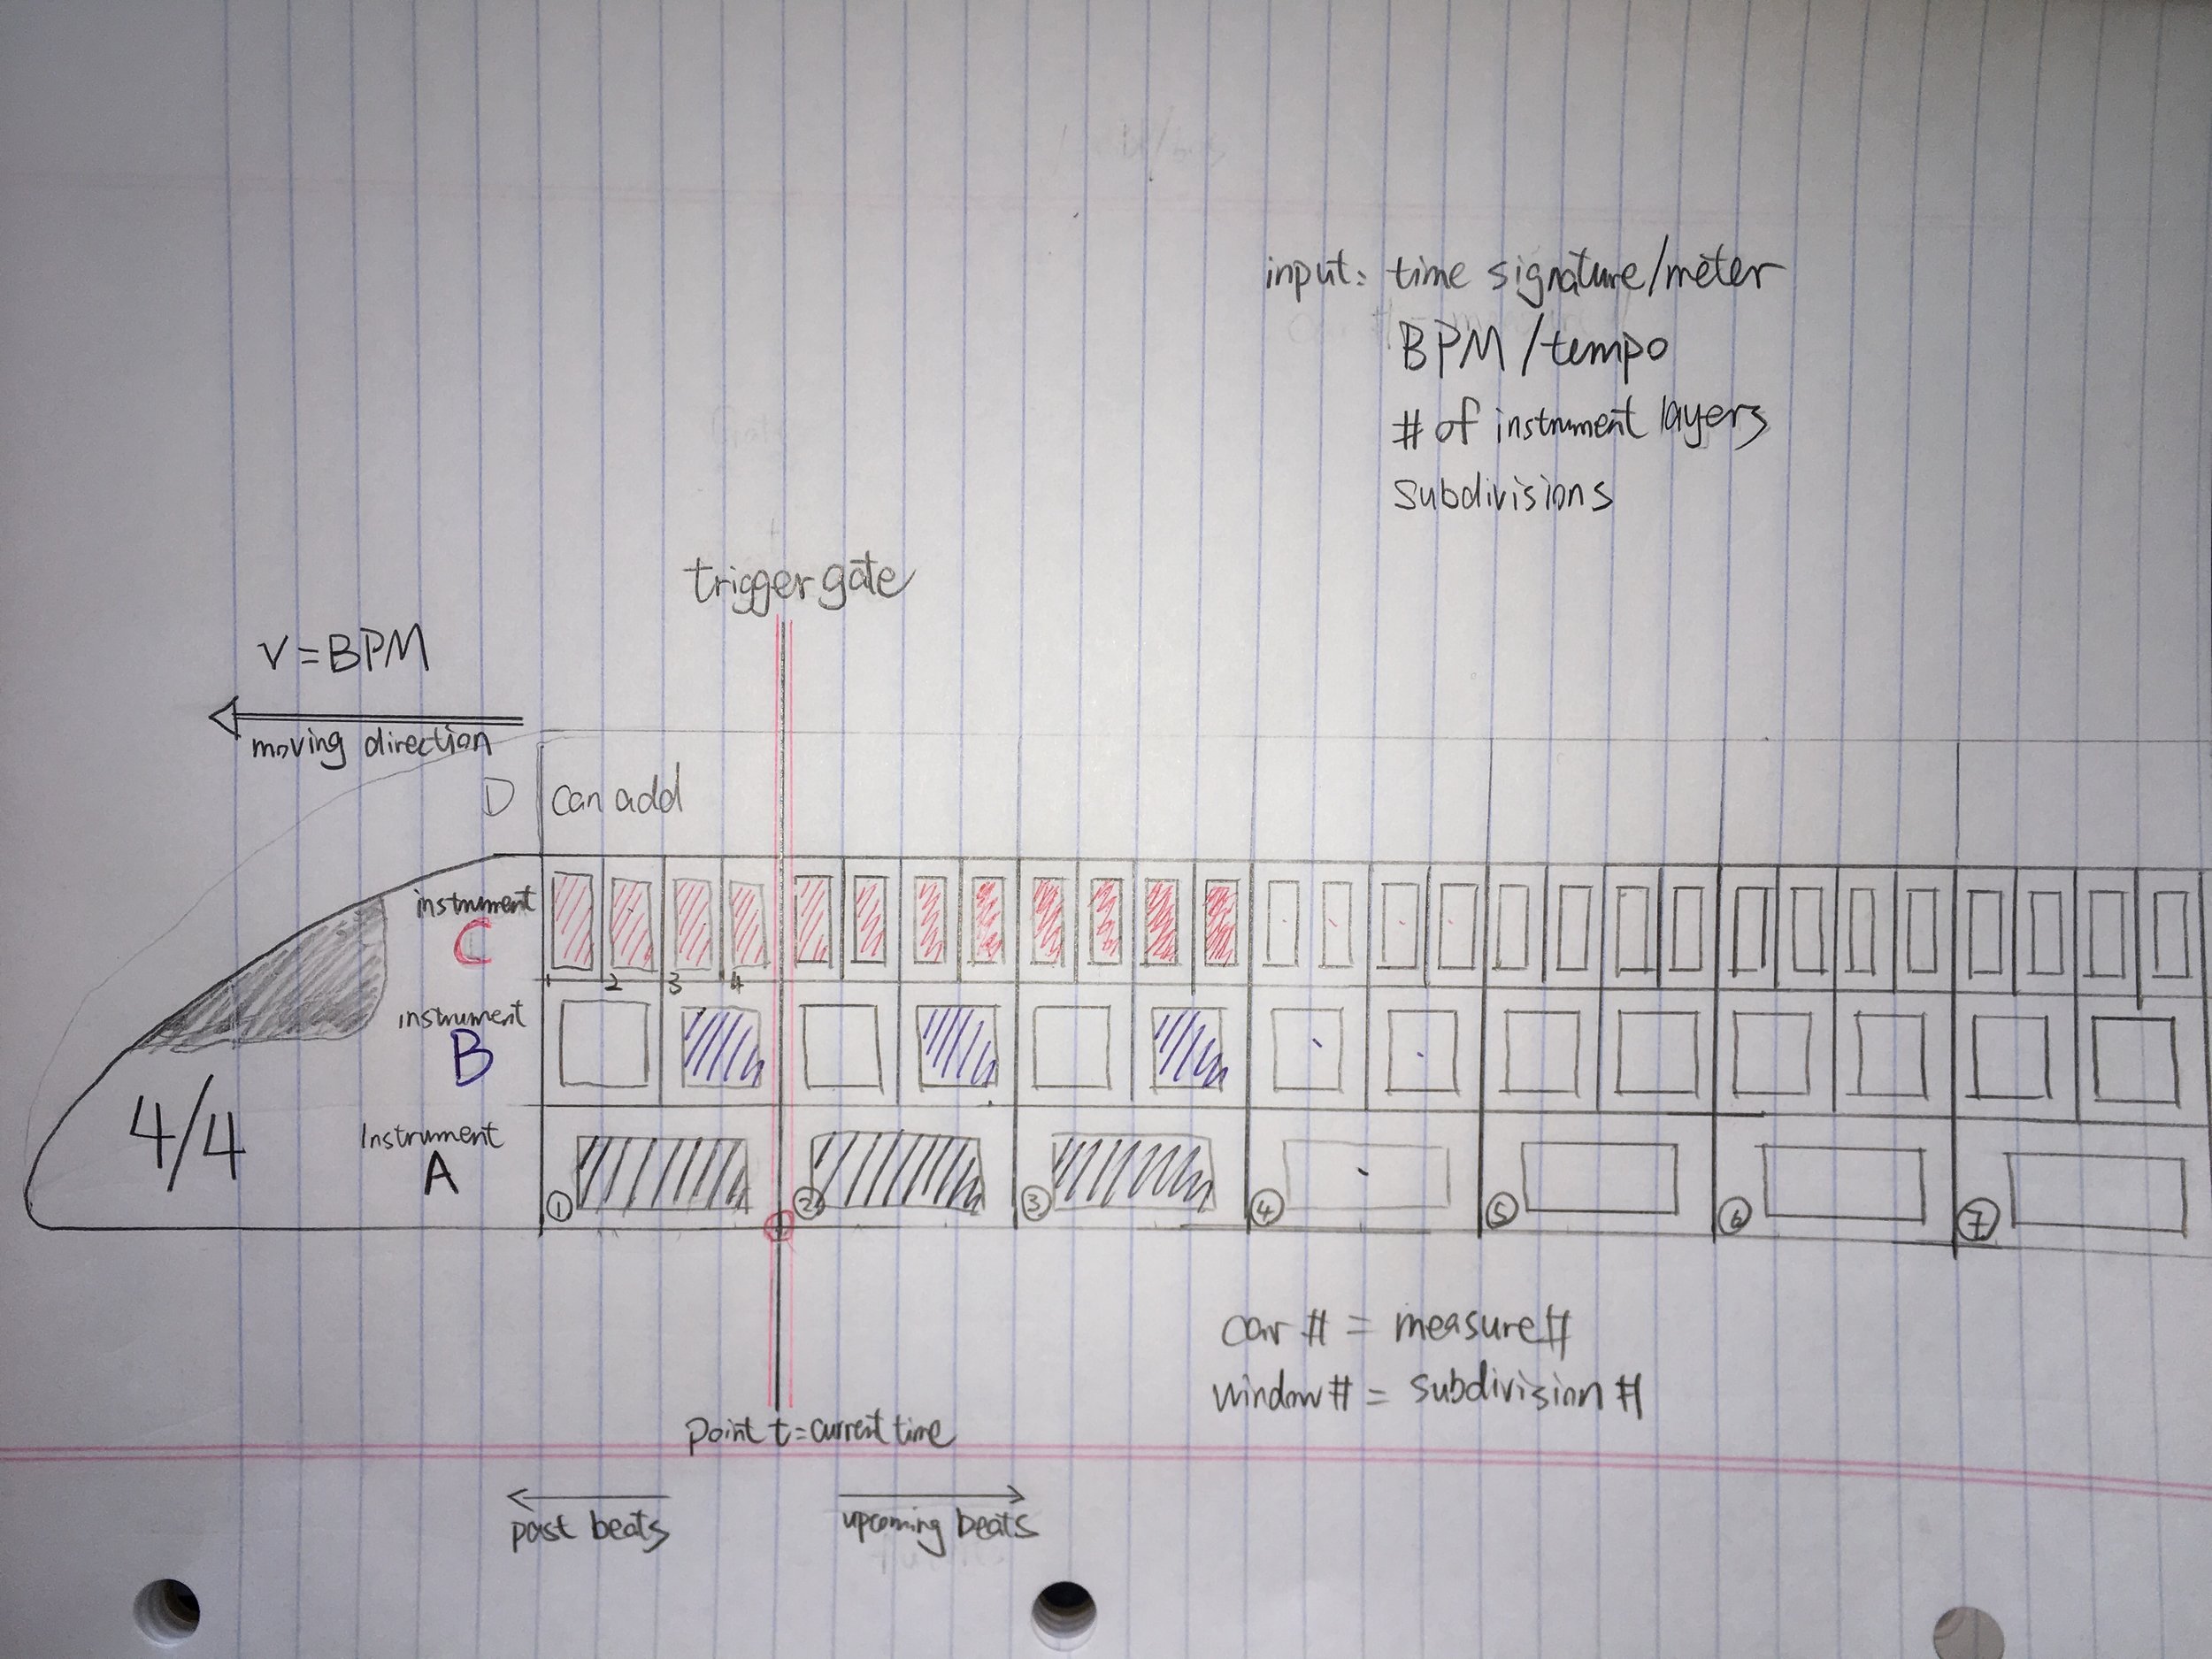
So I thought the noise is a result of a chain of cars passing a fixed point. And the speed of that rhythmic sound is a result of the moving speed of the train, as the train slows down, the pulse also slows down. So I played with the concepts of rhythms and the idea of passing train and its parameters like speed, number of cars, number of levels, numbers of doors and windows, and I was imagining a rhythm interface that is a train passing a gate that triggers different levels of sounds stored in each car. So I created this sketch:

IMG_7664

The train interface is constructed with several parameters:

# of levels: players can import multiple beat samples, each sample track creates a level on the train, tracks stack on top of each other vertically like different levels of the train. The number of levels indicates the number of instrument tracks.

# of cars: the entire length of the train is consist of many cars connected horizontally. Each car number indicates the measure number.

# of windows: players can input a time signature at train head and divide each level of a car into smaller sections represented by the number of windows on each level, this is to mark the subdivisions(windows) in a measure(car). If a player decides the meter to be 4/4, 1 full window on a car is 1 whole note, 2 windows are 2 half notes, and 4 windows are 4 quarter notes, etc... players can then toggle on and off the lights on each window to place a beat of a certain duration at a certain subdivision in a measure, and copy a certain pattern to paste in later windows. As an example, in this loop, the most basic house/techno music rhythm pattern, the black windows in the sketch represents kick drum, blue window snare drum and red window hi-hat.

Speed of the train: players can also input speed of train in the form of BPM, the higher the BPM, the faster the train moves. for example if the meter is 4/4, BPM is 120, there is 120/60=2 beats per second. So we can imagine in every second, two windows of quarter notes would pass a certain point.

Gate: somewhere in the middle of the screen, there is also a gate, a fixed point for each car of the train to pass, acting like a trigger point for each notes(windows) carried in the car. The train travels from right to left, the gate represents current time; everything to the left of the gate is past beats; whereas everything to the right are upcoming beats to be played when they reach the gate.

----------------

Limitations I can think of right now: since I have not yet seen this moving train in action, I can not picture how fast it will move if I set the BPM to a common value like 160, if it moves too fast it will be really hard for our eyes to catch each beat and understand what is really going on in each measure.

Applications: I can see this interface being a game/instrument to be experimented by kids who are learning music and want to create their own beats by helping them visualize how rhythm works while having fun running their own train.

W2 Response to interactive rhythm projects

Two of the drum machine examples that impressed me the most are Groove Pizza and TR-808 re-creation one. Groove Pizza has a very simple, and visually appealing interface. It managed to spatially map every single beat generated by different percussion instruments into points in 2D circular plane, aka, pizza. One cycle through the pizza represents one measure/bar. The number of pizza slices represents the number of subdivisions in a measure. The points are then connected to form different shapes, most of the time symmetrical, given the repetitive nature of rhythm. Therefore, notes on a linear timeline are formed onto a more recognizable spatial arrangement in front of players. Different genres of music have different shape patterns on the pizza, which tells player a lot about the rhythmic characteristics of that genre. I can see this application has great educational potential in music education.

However the project I had the most fun playing with is the Roland TR-808 recreation. It took me a while to figure out how to use it and what each knob and button are for. I looked up the original physical model and noticed they look pretty much the same. This project lacks originality and creativity as it's simply a virtual duplication of the physical machine. However by playing with the web version I was able to get the gist of how the physical drum machine works without having to visit a store or obtaining a physical product. I can see this project being applied to many other musical interfaces by demonstrating how to use them in a very accessible web environment, so that both amateur and professional producers are able to "try out" the machine virtually before they decide which instruments suit them the best.

Here's a screen recording of my first TR-808 creation:

https://youtu.be/1TAtorV5uqw